


How to make a plastic-free Christmas table floral display

Learn how to make a stunning Christmas centrepiece, containing no plastic whatsoever, with some tips from a top flower school
There’s nothing that creates a festive table better than a glorious flower and foliage decoration – but what flora and fauna should you use, and how do you best secure your arrangement?

Build up a display using foliage from your garden
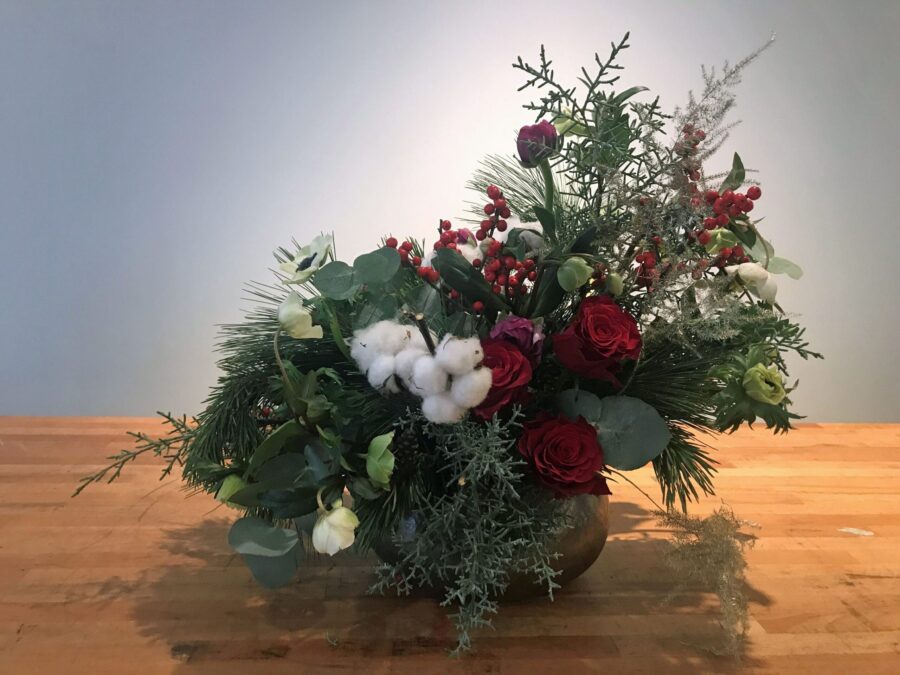
Sophie Powell, principal of McQueens Flower School in London, which runs floral and creative design classes, says that pine, eucalyptus and other stems from your garden can be used as a framework, plus seasonal flowers and other bits and pieces – such as ilex berries and wispy asparagus fronds – to add texture and colour to an arrangement.
Design trends have changed, she says, from very tight, uniform and what she calls ‘cookie cutter’ styles, to more wild, whimsical and less constructed displays, largely because the school is not using flower foam (oasis), because it’s a micro plastic which does not biodegrade.
“Whenever you see a perfect shape, it will have foam underneath it, because you cannot construct it without,” notes Powell. “Flowers hate foam. Foam is like death row for flowers. They don’t last long in it, because their stems become blocked and they can’t take in water.”
She says you can generate a more contemporary arrangement using eco-friendly products and less plastic. Here’s how.
What you’ll need

Basic ingredients
A bowl or vase which is going to suit your size of arrangement.
Medium gauge chicken wire or biodegradable tape.
A variety of foliage stems, which may include pine and eucalyptus.
Seasonal flowers such as hellebores, plus a few colourful accent blooms.
Other floral additions such as berried stems and gold-sprayed asparagus fronds.
Secateurs or sharp scissors.
1. Create your base

Scrunch chicken wire to create a base to secure your stems
Scrunch chicken wire into two or three layers and place it in the bowl or vase, so there are no gaping holes and you’ll be able to weave your stems through them. Make sure the wire reaches the edge of the vase. Then fill it two-thirds full of water.
Alternatively, you can criss-cross recyclable tape on to the top of your vase or bowl to make your grid, through which you will secure your stems.
2. Decide what shape you want
You may want an asymmetric design, which is higher at one side, graduating down in a crescent moon shape, or a symmetric style which is round all over.

Sophie works on an asymmetric shape, starting high at one end and going low at the other
Consider where you are going to place your display. Is it going to be front-facing or on the centre of a table? How you place your stems will depend on that.
“You may choose different foliage to give you texture. If you want something simple but classic, you might just go for one type of foliage, which you can cut at different levels to give it a different slant,” says Powell.
If you want an asymmetric style, put one stem at the top edge and one at the bottom. For a more symmetrical shape, you start at the tallest point in the middle and bring your items around it at graduating levels.
3. Remember the rule of thirds

Ideally, your vase or bowl will be a third and your flowers or stems will be two thirds, she advises (although rules are made to be broken). And if you are likely to have any foliage coming over, ensure it doesn’t touch the table.
When cutting stems, measure them against the height of the vase, which will give you an idea of where you need to cut to give you the final height of each item you are adding.
4. Use the largest stem first

“Outline the shape with the foliage. You may have a piece of foliage which is a great shape and you really don’t want to cut it down. You might want to use that as the biggest.
“If you are going asymmetric, always keep the top part quite light,” Powell advises. “And always finish your edges with something quite light.”
5. Prepare your foliage
Strip the leaves at the base so they don’t go in the water, because leaves in the water lead to bacteria, and your flowers aren’t likely to last as long.

Strip the stems so no foliage goes into the water
“Always cut [the stem] at an angle. As it’s on a diagonal line, by millimetres, that’s going to increase the surface area, so the flowers will drink more water. Feed the stems through the chicken wire to create your framework. They may be a bit wobbly initially, but as you add more, it will help them stand up.
“The aim of the game is to cover your chicken wire,” she observes. “If you have pine with cones attached, which you might get with varieties like Pinus mugo, make sure you can see those cones when you place them.”
6. Group flowers

Once all your foliage is in place, decide where to put your flowers for balance and wow factor.
“We group one type of flower together. You may have different levels, which creates more interest. Three always looks fine, but if there’s space at a different level, you could go for more,” she says.

Key festive flowers include red roses, while hellebores and anemones are great filler flowers. If you have wispy decorative foliage, such as gold-sprayed asparagus fronds, add that at the end where needed.
7. Add more foliage if necessary
If you can still see any chicken wire once you’ve added all your flowers, go back and add more foliage to fill in the gaps.
8. Maintain the display
Change the water ever three days by gently tipping the old water out of the container, holding the flowers in place. Add new water by pouring lightly from a jug.
You may want to add a sterilising tablet such as Milton to the fresh water beforehand, to help keep the water fresh.
Your flowers should last around five days.
The Press Association
Latest posts by The Press Association (see all)
- Beatles documentary Let It Be to be released on Disney+ - April 16, 2024
- How to keep your money safe – as criminals ramp up AI tactics to steal consumer data - April 16, 2024
- Seasoned marathon runners give their best race day tips for first-timers - April 16, 2024
- What are heat pumps and could they help your home save energy? - April 15, 2024
- Trailer for Bridgerton season three teases new friends-to-lovers romance - April 12, 2024