


10 Easy Steps to Create a Beautiful Gift Tag

There are lots of summer birthdays and anniversaries coming up, why not go the extra mile and dress up your presents with this gorgeous gift tag that you can make yourself?
Hochanda is here with this fabulous tutorial from Bee Crafty, which teaches you to create a tag that makes your gift really stand out from the rest. Follow the ten easy steps below!
“I love making tags, they are absolutely awesome for a fun quick make, to get your mojo going, or to practice techniques” Bev from Bee Crafty tells us. So, today Bev has made a guide to creating this bright tag with spray inks & Bee Crafty Stamps.![]()
Step 1
![]() First, you need a tag. Bev uses a Tim Holtz Distress Tag Number 8 and has selected three Dylusions Ink Spray Colours: Laidback Lilac, Bubblegum Pink & Lemon Zest.
First, you need a tag. Bev uses a Tim Holtz Distress Tag Number 8 and has selected three Dylusions Ink Spray Colours: Laidback Lilac, Bubblegum Pink & Lemon Zest.
Tip: Work on tissue paper when you use spray ink, it contains the over spray and gives some great paper for mixed media, layering or journaling for later!
Step 2
![]() Spray your inks in a random way across your tag and then dry with your heat tool.
Spray your inks in a random way across your tag and then dry with your heat tool.
Step 3
![]() Once it was dry, Bev picked two Dylusions Shimmer Sprays and the White Linen Dylusions Ink Spray. Then after mixing she removed the lid and tapped to create the droplets on the tag.
Once it was dry, Bev picked two Dylusions Shimmer Sprays and the White Linen Dylusions Ink Spray. Then after mixing she removed the lid and tapped to create the droplets on the tag.
Tip: Store your White Linen Dylusions Spray and Shimmer Sprays on their side to help prevent blockages. When you want to use them, swirl; do not shake as this will help prevent air bubbles too.
Step 4
![]() Let’s get stamping! Bev used the Bee Crafty Art Stamps Small Crowns & Roman Numerals to create a background. Then, layer up your tag onto black card – as you have stamped in black, it will really help it pop.
Let’s get stamping! Bev used the Bee Crafty Art Stamps Small Crowns & Roman Numerals to create a background. Then, layer up your tag onto black card – as you have stamped in black, it will really help it pop.
Step 5
![]() Next, Bev used the Bee Crafty Art Stamps Bee Monarchy and stamped onto white card.
Next, Bev used the Bee Crafty Art Stamps Bee Monarchy and stamped onto white card.
Tip: If you are using versafine make sure to heat set it – we are using spray inks again.
Step 6
![]() Cut your bees & accessories out.
Cut your bees & accessories out.
Step 7
![]() Using your same Dylusions Ink Colours, spray your bees and accessories, and dry with a heat tool (you can leave to dry if you prefer but Bev says she is impatient!)
Using your same Dylusions Ink Colours, spray your bees and accessories, and dry with a heat tool (you can leave to dry if you prefer but Bev says she is impatient!)
Step 8
![]() Decide where you want to place your cut outs and stick them on. Bev used 3D foam, but you could use 3D gel or hot glue.
Decide where you want to place your cut outs and stick them on. Bev used 3D foam, but you could use 3D gel or hot glue.
Step 9
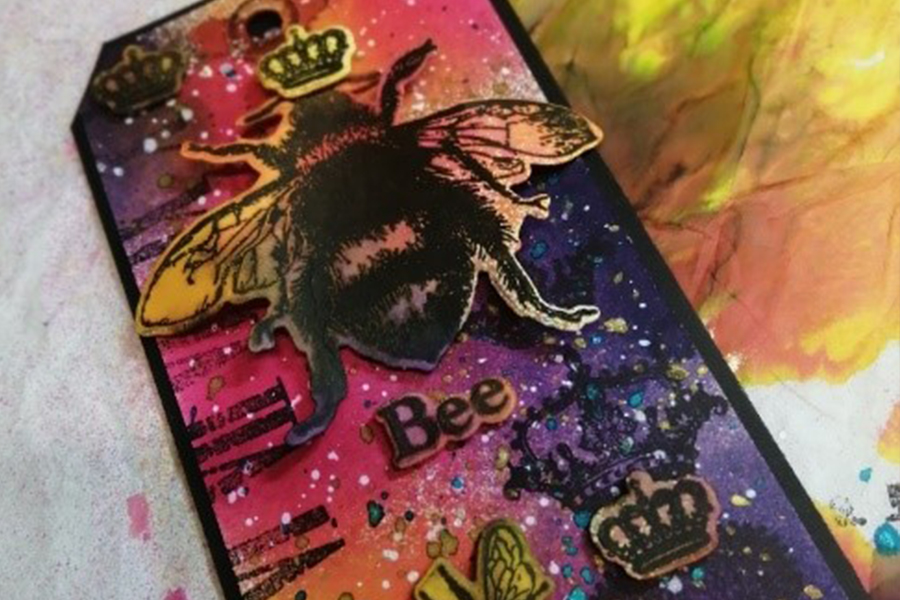
![]() Now it is time to grab your favourite white pen and add some details. Bev went for some fauz stitching and some highlights on the big bee.
Now it is time to grab your favourite white pen and add some details. Bev went for some fauz stitching and some highlights on the big bee.
Step 10
![]() All that is left to do is to add your ribbon on, and then you are done! Quick, easy, fun and lots of great inkiness.
All that is left to do is to add your ribbon on, and then you are done! Quick, easy, fun and lots of great inkiness.
Think of how chuffed the lucky person receiving this will be… their face will light up to your gift and its beautiful tag! Get all your Bee Crafty essentials for your next tag at www.Hochanda.com