


9 Steps to Create a Beautiful Rose Pouch

Can you believe that it is July already?!
If you want to create something pretty and perfect for the summer, then Hochanda have the answer! From one of their suppliers, Craft Yourself Silly, comes this brilliant easy to follow tutorial that shows you how to create your very own beautiful rose pouch – ideal for storing your crafty bits in style!
Before You Start
Use ¼” seam allowance required throughout.
Fabric and cutting requirements:
- Cut out the four pouch pieces and applique section from the fabric panel
- Cut out a piece of fusible webbing 15cm x 15cm
Step 1
![]() Begin by adding the applique pieces to the front of the pouch. Iron the fusible webbing onto the back of the applique panel. Allow the fabric to cool then cut out and stitch on the pieces one at a time using a fine satin stitch. If you want to add extra body to your work, add wadding to the back of the front panel before you stitch on the applique pieces.
Begin by adding the applique pieces to the front of the pouch. Iron the fusible webbing onto the back of the applique panel. Allow the fabric to cool then cut out and stitch on the pieces one at a time using a fine satin stitch. If you want to add extra body to your work, add wadding to the back of the front panel before you stitch on the applique pieces.
Step 2
![]() Add the zip. It is about two inches longer than you will need but this makes the sewing much easier. Place the front of the pouch face up, the zip face down (some hanging out each side) in line with the top edge of the lining and then the lining face down on top. Stitch alongside the topside zip to secure the three panels together.
Add the zip. It is about two inches longer than you will need but this makes the sewing much easier. Place the front of the pouch face up, the zip face down (some hanging out each side) in line with the top edge of the lining and then the lining face down on top. Stitch alongside the topside zip to secure the three panels together.
Step 3
![]() Fold back the fabrics to reveal the zip and press into place. Repeat the layering procedure for the other side of the zip. Ensure you square up the layers so that they are directly lined up on top of each other. Stitch the zip in place, fold out and press to reveal the zip.
Fold back the fabrics to reveal the zip and press into place. Repeat the layering procedure for the other side of the zip. Ensure you square up the layers so that they are directly lined up on top of each other. Stitch the zip in place, fold out and press to reveal the zip.
Step 4
![]() Top stitch both sides then open the zip halfway, you will need this later to turn the project right side out.
Top stitch both sides then open the zip halfway, you will need this later to turn the project right side out.
Step 5
![]() Open out the sides of the pouch placing the right sides of the outer and lining together. Line them up with the notches at the bottom, pin into place, then sew down all four sides. Start at the bottom notches then sew towards the zip. Get as close as you can, the top stitched section should get right to the zip, and backstitch to secure. Don’t worry about the small gap near the zip this will be concealed when turned right side out.
Open out the sides of the pouch placing the right sides of the outer and lining together. Line them up with the notches at the bottom, pin into place, then sew down all four sides. Start at the bottom notches then sew towards the zip. Get as close as you can, the top stitched section should get right to the zip, and backstitch to secure. Don’t worry about the small gap near the zip this will be concealed when turned right side out.
Step 6
![]() Leaving the missing corners, open stitch all the way along the bottom of the outer panels of the pouch and stitch 5cm (two inches) in from each corner on the lining side, leaving a gap to turn the whole project right side out.
Leaving the missing corners, open stitch all the way along the bottom of the outer panels of the pouch and stitch 5cm (two inches) in from each corner on the lining side, leaving a gap to turn the whole project right side out.
Step 7
![]() Fold the corners of the pouch so the seams line up on top of each other, then stitch across the bottom of the corner on each side.
Fold the corners of the pouch so the seams line up on top of each other, then stitch across the bottom of the corner on each side.
Step 8
![]() Turn the project right side out. Fold in the seam allowance on the opening in the lining and press in place before sewing the gap up.
Turn the project right side out. Fold in the seam allowance on the opening in the lining and press in place before sewing the gap up.
Step 9
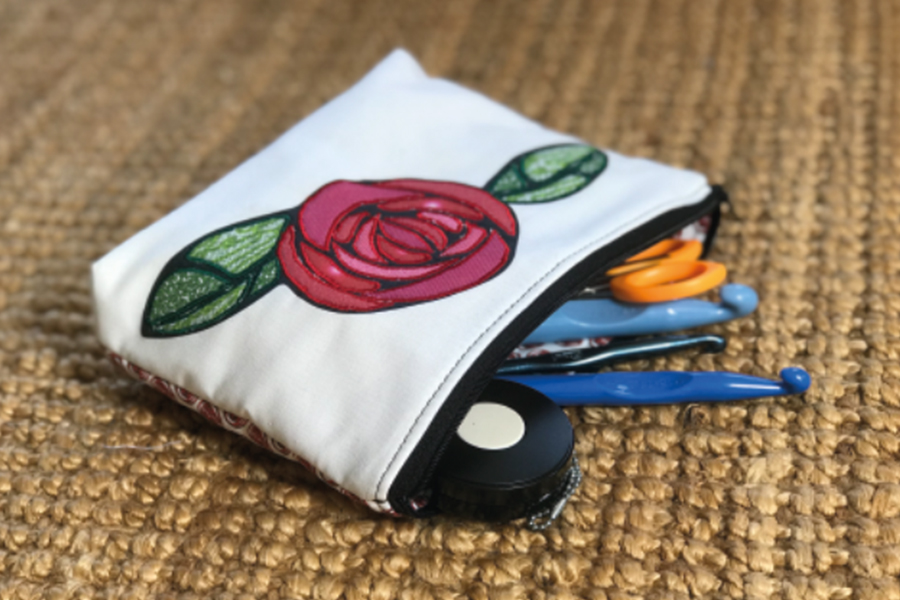
![]() Tuck in the lining and your pouch is complete!
Tuck in the lining and your pouch is complete!
Well done! Now you have your very own lovely rose pouch. Have it on display in your craft room as art to show off the work you’ve done!
You can find more products from Craft Yourself Silly on www.Hochanda.com