


Recipes for chocolate lovers

Sometimes only chocolate will do. Smooth, rich and delicious, little compares to the decadence of a chocolate flavoured dessert.
When the craving strikes, we’ve got you covered – here are four of our favourite chocolate recipes to satisfy your sweet tooth and impress your family and friends.
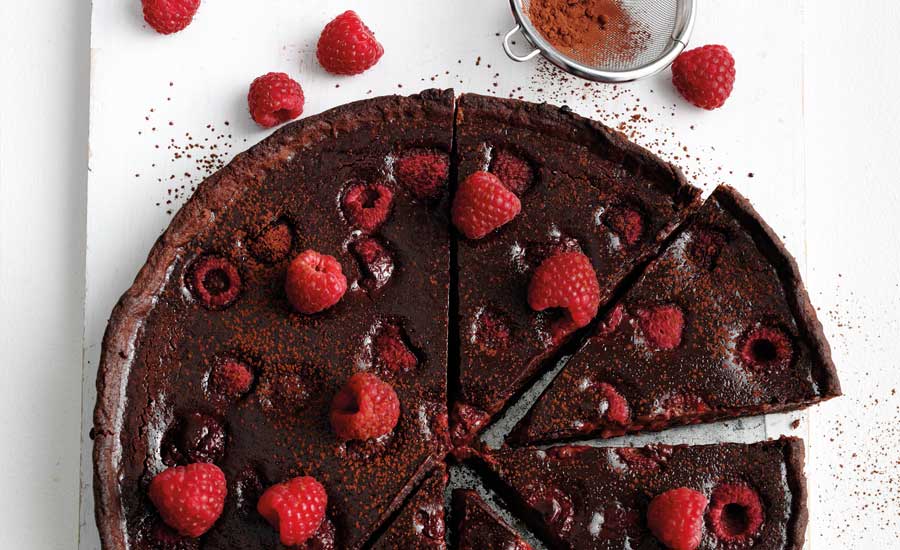
Chocolate and Raspberry Tart

This chocolate and raspberry tart recipe is rich, chocolately and delightfully moreish – the perfect grown up treat!
Serves: 8 Prep time: 30 minutes Chilling time: 30 minutes Cooking time: 40-50 minutes
Chocolate pastry
- 175g (6oz) plain flour
- 15g (1/2oz) cocoa powder
- 50g (2oz) caster sugar
- 100g (4oz) butter, diced
- 2 egg yolks
Filling
- 250ml (8fl oz) double cream
- 125ml (4fl oz) semi skimmed milk
- 150g (5oz) dark chocolate, broken into pieces
- 2 medium eggs
- 65g (21/2oz) caster sugar
- 1⁄2 teaspoon vanilla bean paste or extract
- 175g (6oz) pack fresh raspberries
- Extra raspberries and a little sifted cocoa powder to decorate
What to do:
- To make the pastry, sift the flour and cocoa into a bowl, add the sugar and the butter and rub the butter in with fingertips or an electric mixer until it resembles fine crumbs.
- Stir in the egg yolks and gradually bring the crumbs together, squeezing with fingertips and bring together to form a ball. Add a little cold water if needed.
- Knead the pastry lightly and roll out thinly on a lightly floured surface. Lift the pastry over a rolling pin and then drape into a 24cm (91⁄2in) fluted flan tin that is 2.5cm (1in)deep. Ease the pastry into the flan tin, pressing into the flutes. Trim the pastry a little above the top of the tin with scissors to allow for shrinkage during baking. Prick the base with a fork and chill in the fridge for 30 minutes.
- Preheat the oven to 190°C/375°F/Gas Mark 5. Transfer the chilled tart tin to a baking sheet, line the pastry case with a large square of non-stick baking paper and fill with baking beans. Cook for 10 minutes. Carefully lift the paper and beans out of the pastry case and cook for 5-10 more minutes until the base is crisp.
- Meanwhile make the filling – pour the cream and milk into a saucepan, bring just to the boil, take the pan off the heat and add the chocolate. Leave for five minutes until melted. Whisk the eggs, sugar and vanilla together in a bowl until smooth and gradually whisk in the warm chocolate milk.
- Sprinkle the raspberries over the base of the warm pastry case. Strain the warm chocolate cream into the tart case and cook in the oven reduced to 160°C/325°F/Gas Mark 3 for 25-30 minutes or until just set with a slight wobble in the centre. Leave to cool at room temperature for at 1-11⁄2hours. The tart can be made in advance and chilled in the fridge but the filling will be much firmer when sliced.
- When ready to serve, remove the tin and transfer tart to a serving plate. Sprinkle a few extra raspberries over the top and decorate with a little sifted cocoa. Cut into slices to serve.
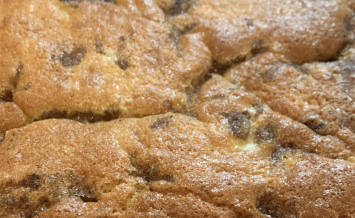
White chocolate and raspberry blondies

White chocolate and raspberry blondies are a great alternative to the classic brownies.
Cuts into 12
Preparation time: 30 minutes
Cooking time: 30-35 minutes
INGREDIENTS:
150 g (5 oz) white chocolate
100 g (4 oz) butter
3 eggs
175 g (6 oz) caster sugar
1 teaspoon vanilla essence
200 g (7 oz) self-raising flour
1 teaspoon baking powder
175 g (6 oz) raspberries
To Decorate:
75 (3 oz) white chocolate, melted to decorate
WHAT TO DO:
1) Preheat an oven to 180°C, 350°F, gas mark 4. Line an 18 x 28 cm (7 x 11 inch) roasting tin with a large piece of non-stick baking paper, snipping diagonally into the corners so that the paper fits snugly over the base and up the sides of the tin.
2) Break the chocolate into a bowl, add the butter and set the bowl over a saucepan of gently simmering water and leave until melted.
3) Whisk the eggs, sugar and vanilla in a second bowl with an electric whisk for about 5 minutes until very thick and the mixture will leave a trail when the whisk is lifted up.
4) Gently fold the melted chocolate and butter into the egg mixture then the flour and baking powder. Pour the mixture into the lined tin and sprinkle with the raspberries.
5) Bake for 30-35 minutes until well risen, the top is crusty and the centre still a little soft. Leave to cool in the tin then lift the paper and blondies out of the tin and put on to a chopping board. Drizzle with the melted chocolate to decorate then leave to set. Cut into squares and peel off the paper to serve.
Unlike a Victoria sandwich style cake, blondies or brownies are almost better if they are slightly undercooked as the high proportion of chocolate will firm up slightly as it cools.
Chocolate dipped strawberries

Quick and easy, this recipe is fast and easy to whip together when you want a little something sweet. Perfect for a decadent treat or a light dessert after dinner.
Makes: 20 strawberries Preparation time: 30 minutes Cooking time: 10 minutes
You’ll need:
- 200g dark chocolate
- 20 strawberries (approx.)
- 100g white chocolate buttons
- range of food colouring (optional)
- small cake decorations such as silver balls or hundreds and thousands (optional)
Method
- Start by melting the dark chocolate in a heatproof bowl over a pan of barely simmering water. Make sure the base of the bowl does not touch the water. Break the chocolate into small pieces and allow to melt slowly without stirring. While this is happening, lay a piece of parchment paper down.
- Once the chocolate has melted, remove from the heat, and allow to cool for 5 minutes.
- Holding the strawberry by the leaves dip the strawberry completely into the chocolate, right up to top, so just the green is left. Hold the strawberry up and allow the excess to drip off.
- Carefully lay the strawberry down onto the parchment paper and allow to cool completely.
- Melt the white chocolate in the same way. Once melted divide the chocolate into bowls and if using food colouring, colour the white chocolate with the different food colouring at this stage.
- Pour the melted white chocolate into disposable piping bags. Snip a tiny hole in the end of the piping bag, and drizzle the chocolate over the Viva strawberries. You could do lines, dots or zigzags and alternate colours and designs. If you don’t have a piping bag, use a teaspoon to drizzle the chocolate over the Viva strawberries.
- Attach decorations (if using) while the white chocolate is still melted and tacky. Use any remaining white chocolate to coat some extra Viva strawberries. Allow to set completely, and enjoy the same day.
Devil’s Food Cake
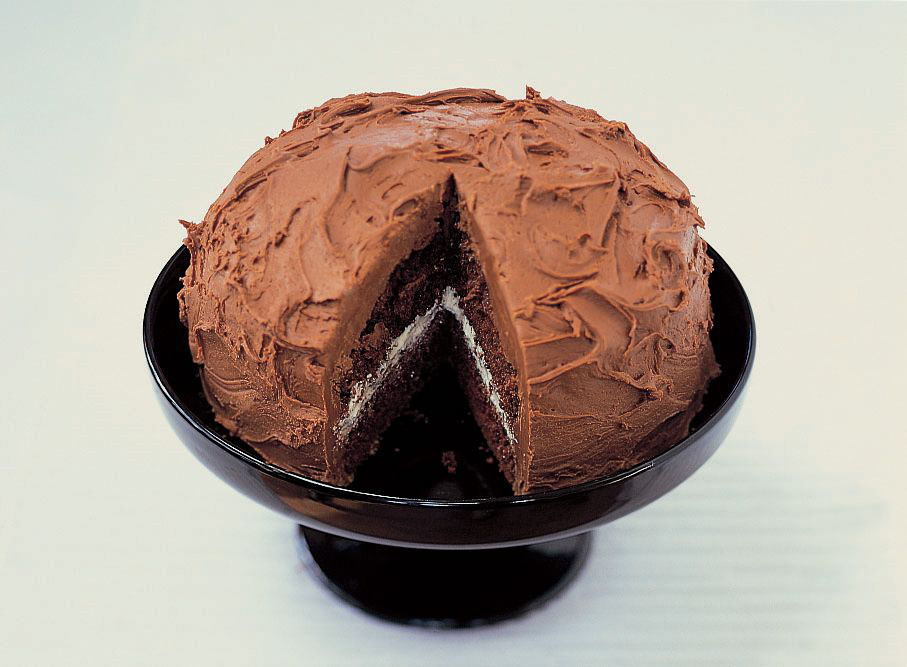
A classic for a reason. Use this delicious recipe for birthdays and special occasions or pull it out just because – it’s the only cake recipe you need in your arsenal.
Makes: 12-14 slices
You’ll need:
- 250g light soft brown sugar
- 75g spreadable butter
- 2 medium eggs, lightly beaten
- 175g plain flour
- 200ml milk
- 75g dark chocolate drops
- 1tsp bicarbonate of soda
For the butter icing:
- 50g spreadable butter
- 100g icing sugar, sieved
- Warm water
- For the chocolate frosting:
- 125g dark chocolate chips
- 300g icing sugar, sieved
- 1-2tbsp hot water
- 1 large egg yolk, lightly beaten
- 50g butter, melted
Method
- Pre-heat the oven to 175C/160C fan. Prepare two 8-inch sandwich tins.
- Cream the butter and sugar together and beat well. This will have a strange texture – not pale and fluffy like usual creaming – because of the high proportion of sugar to butter.
- Add the egg, little by little, beating well all the time. Stir in the flour, very gently, bit by bit (or use the pulse setting on the mixer, and add the flour through the feed tube in spoonfuls). Stir the bicarbonate into the milk, then add it to the cake mix, stirring all the time.
- Melt the chocolate in a bowl over hot water or in the microwave (this takes about two to two-and-a-half minutes on full power). Let it cool a little, then stir gently into the cake mix.
- Turn the mix into the sandwich tins, dividing it evenly, and smooth the tops. Bake for 30-35 minutes, or until the cakes are springy or a knife inserted in the centre comes out clean.
- Allow to cool for a couple of minutes in the tins, then turn out onto a rack to cool completely.
- To make the butter icing, put the 50g of butter and 100g of sieved icing sugar into a mixing bowl and beat together. Add a few drops of warm water to soften it if necessary, and keep beating until the mixture gets really light and fluffy.
- To make the chocolate frosting, melt the 125g of chocolate in a bowl over hot water, or in the microwave. Stir in the 300g of icing sugar with a little hot water. This will be tricky and the texture will become very granular, but keep going until it’s nearly mixed in, then, using an electric mixer if possible, gradually beat in the egg yolk and butter, adding a little more hot water as necessary, to reach a smooth, spreadable consistency.
- Sandwich the cakes together with butter icing, then spread the entire cake with chocolate frosting.
Rachel - Silversurfers Assistant Editor
Latest posts by Rachel - Silversurfers Assistant Editor (see all)
- Graham Norton’s funniest interviews - April 2, 2024
- Chocolate dipped strawberries for Easter - March 28, 2024
- Elton John’s Greatest Hits Playlist - March 24, 2024
- The best of Diana Ross - March 23, 2024
- Easter activities for grandchildren - March 23, 2024